Thursday, November 11, 2010

A Brief Introduction to Microsoft's Log Parser Tool

Microsoft provides the Log Parser tool free of charge.  This tool can be used to extract data from a variety of sources including IIS log files, the Windows event log, and Active Directory.  It can then transform the log data into another format such as XML or CSV or export the data to a database table.  Users can limit the data they want to retrieve by using SQL queries.  I will provide a quick example that selects and displays data from an IIS log file.


The first step to using the Log Parser tool is to download and install it.  You can find the installation file here: http://www.microsoft.com/downloads/en/details.aspx?FamilyID=890cd06b-abf8-4c25-91b2-f8d975cf8c07&displaylang=en.


After installing Log Parser open the command prompt and navigate the the directory where the LogParser.exe file was installed.  On my instance of Windows XP the tool was installed at C:\Program Files\Log Parser 2.2.  I have a local instance of IIS running a web site and I want to see what requests it has logged today.  I execute the command below.

 LogParser -i:IISW3C -o:DATAGRID "SELECT time, cs-method, cs-uri-stem FROM 'C:\WINDOWS\system32\Logfiles\W3SVC1\ex100924.log'"

The -i argument indicates the input format.  In this case the W3C log file format used by IIS.  The -o parameter indicates the output format.  In this case a datagrid.  The final argument is my query.  I have specified the fields I want returned in the SELECT clause and in the FROM clause I have provided the path to the log file I want to examine.  If I wanted to retrieve data from multiple log files I would use an asterisk  as a wildcard character.  To get all log files in the directory I would use:

'C:\WINDOWS\system32\Logfiles\W3SVC1\*.log'

You will also note that I have enclosed the path in single quotes since it contains spaces.


Here is a screen shot of the output.


References


Download Log Parser

http://www.microsoft.com/downloads/en/details.aspx?FamilyID=890cd06b-abf8-4c25-91b2-f8d975cf8c07&displaylang=en

The W3C Log File Format for IIS


Tuesday, November 9, 2010

Basic ASP.Net MVC Site


In this post I will demonstrate how easy it is to create an ASP MVC site with basic CRUD operations on the Chinook database.

  1. Start Visual Studio and create a new project using the ASP.Net MVC 2 template. I'm a proponent of Unit Testing, but for today's demo let's do not create the unit tests.
  2. Right-click the Models folder and select Add->New Item->Data->ADO.Net Entity Data Model.
  3. Name the Model Chinook.edmx and choose the Artists table to import into the model.
  4. Right-click the Controllers folder and select Add->Controller. Name the controller ArtistController and check the box to Add action methods for our CRUD operations.
  5. Next, In the Index function select all artists from the Artists table in the Chinook database like this...
public ActionResult Index()
{
using (ChinookEntities chinook = new ChinookEntities())
{
var allArtists = from artists in chinook.Artists
orderby artists.Name
select artists;

return View(allArtists.ToList());
}
}
  • Right-click "View(allArtists)" and select Add View->Check the box for Create Strongly-Typed View->Select ChinookArist.Models.Artist->Select List for View Content->Hit the Add button.
  • Now add a link to our controller in the Site.Master and we're ready to go.
  • Run the project and hit the link to Artists and you get a list of all artists in the table.


To add the details view to our project add the following snippet to the Details(int id) function in ArtistController.cs...

public ActionResult Details(int id)
{
using (ChinookEntities chinook = new ChinookEntities())
{
var artist = (from a in chinook.Artists
where a.ArtistId == id
select a).First();

return View(artist);
}
}
Next, right-click "Details" and select Add View. Be sure to select Details for our View content drop-down. Voila, a Details.aspx page is create for us.

Editing a record works in a similar manner. Add the following code to ArtistController...
public ActionResult Edit(int id)
{
using (ChinookEntities chinook = new ChinookEntities())
{
var artist = (from a in chinook.Artists
where a.ArtistId == id
select a).First();

return View(artist);
}
}

This will return the record to edit. Right-click the Edit and follow the steps to create and edit page. In addition, you will need the following which will actually perform the editing...
[HttpPost]
public ActionResult Edit(int id, FormCollection collection)
{
try
{
using (ChinookEntities chinook = new ChinookEntities())
{
var artist = (from a in chinook.Artists
where a.ArtistId == id
select a).First();

artist.Name = collection[1].ToString();
chinook.SaveChanges();
}
return RedirectToAction("Index");
}
catch
{
return View();
}
}


To creating a new record use the following...
[HttpPost]
public ActionResult Create(FormCollection collection)
{
try
{
using (ChinookEntities chinook = new ChinookEntities())
{
Artist artist = new Artist();
artist.Name = collection[0].ToString();
chinook.AddToArtists(artist);
chinook.SaveChanges();
}

return RedirectToAction("Index");
}
catch
{
return View();
}
}

Right-click Create and a new aspx page is created for us.

Deleting a record is similar to editing in that it requires two functions...
public ActionResult Delete(int id)
{
using (ChinookEntities chinook = new ChinookEntities())
{
var artist = (from a in chinook.Artists
where a.ArtistId == id
select a).First();

return View(artist);
}
}

and...

[HttpPost]
public ActionResult Delete(int id, FormCollection collection)
{
try
{
using (ChinookEntities chinook = new ChinookEntities())
{
var artist = (from a in chinook.Artists
where a.ArtistId == id
select a).First();
chinook.DeleteObject(artist);
chinook.SaveChanges();
}
return RedirectToAction("Index");
}
catch
{
return View();
}
}

Once again, right-clicking the Delete function and following the prompts will create a delete.aspx page for us.


In just a few minutes I have created a simple, yet fully functional MVC application with complete CRUD operations on a table.


Thursday, November 4, 2010

TSQL Delimited List From Rows

Using TSQL, at some point you may need to create a column that contains a list of values that are normally rows in SQL Server. This blog entry will show you how to do that using the Chinook database (available at http://chinookdatabase.codeplex.com).

For sake of argument let's return a list of artists from the Artist table. First, a simple select query will return the following results...


The following TSQL code will return our delimited results.

Declare @ArtistAlbum varchar(1000)
Select @ArtistAlbum = coalesce(@ArtistAlbum + ', ', '') + Artist.Name From Artist
Select @ArtistAlbum

Tuesday, November 2, 2010

Creating a Data-driven Subscription in Report Services

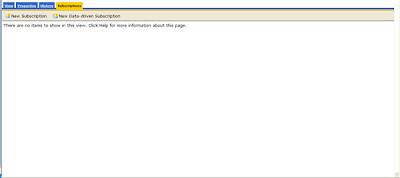
To create a data-driven subscription in Reporting Services select the report and click on the Subscriptions tab, then click the New Data-driven Subscription button.


Step 1.
You will be asked to enter a description and a format in which to deliver the report. As shown below I have chosen to e-mail the report. I have also chosen to specify a shared data source. Click the Next button.


Step 2.
Select the shared data source for your report and click the Next button.


Step 3.
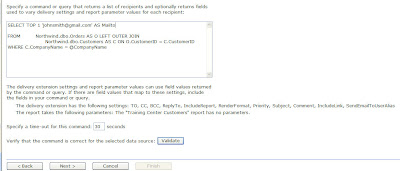
Since I only want to send this report if it contains data, I used SELECT TOP 1. I also specified an e-mail address to send the report to. The report will be sent to johnsmith@gmail.com. The rest of the select statement I copied from my original select statement that I used to create the report. Click the Validate button to make sure your sql is correct, then click the Next button.


Step 4.
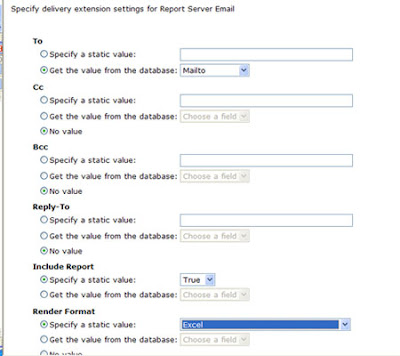
To send the e-mail to John Smith, choose the 'Get the value from the database:' radio button and select Mailto since that is the variable name used in the previous sql statement. Choose to include the report and select the format in which the user will view the report. I have chosen to send the user an Excel document. Click the Next button at the bottom of the page.


Step 5.
If the report contains parameters you will need to specify them at this time. They can be static variables or they can be chosen from the sql statement entered earlier.

Step 6.
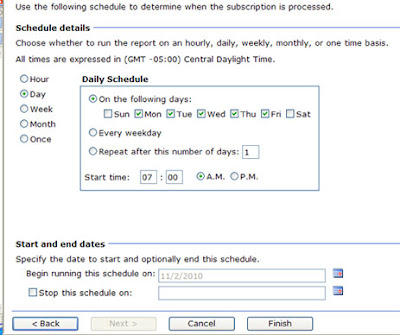
To set a schedule, click the ‘On a schedule created for this subscription’ radio button.


Step 7.
I have chosen to send this report Monday through Friday at 7:00 am. Click the Finished button.