Monday, February 28, 2011

Providing Default Values to Wijmo Tooltips

The Wijmo Tooltip widget has certain properties set to default values.  Developers may find that  these defaults are not appropriate for the web site we are using them in.  In this post I will demonstrate how to provide your own default options for the Wijmo Tooltip widget without modifying the Wijmo source code.  This will allow you to attach tooltips to your markup without needing to duplicate the options object you provide on every page.

By default the display of the tooltip will include a callout element.  This is the wedge that points the tooltip bubble to the element the tooltip is associated with.  Below is a screenshot of a tooltip which includes the callout.
If I want to omit the callout element I can do so by using the showCallout option and setting the value to false.  Rather than include this option everytime the tooltip is used I can add a JavaScript file that will override the default options for the tooltip.  Below is the content of the file.


jQuery(document).ready( function() {
 jQuery.extend( jQuery.wijmo.wijtooltip.prototype.options, { showCallout: false } );
});


Note that I have used jQuery's extend method to merge my default values into those used by the Wijmo tooltip.

Here is a screenshot of the tooltip without the callout.
I will need to include the file which includes my custom configuration after the Wijmo tooltip file is included.  Below is the complete HTML code for the example. Note that the "custom-options.js" file is included after the usual jQuery and Wijmo files.  This will cause any Wijmo tooltips included on the page to use the new default settings which will not display the callout element.  I would include this JS file on every page of my site that uses Wijmo in order to set my own default values without modifying the Wijmo source code.
<!doctype html>
<html>
<head>
 <title>Wijmo Tooltip - Set Defaults</title>
 <link type="text/css" rel="stylesheet" href="jquery.ui.all.css">
 <link type="text/css" rel="stylesheet" href="jquery.wijmo-open.1.1.2.css">
 <script type="text/javascript" src="jquery-1.4.4.min.js"></script>
 <script type="text/javascript" src="jquery-ui-1.8.7.custom.min.js"></script>
 <script type="text/javascript" src="jquery.wijmo-open.1.1.2.min.js"></script>
 <script type="text/javascript" src="custom-options.js"></script> 
</head>
<body>

<h1>Weather Tooltip - Customized Defaults</h1>

<div>
 <ul id="cityList">
  <li data-zipcode="78701"><span class="x-tooltip">Austin, TX</span></li>
  <li data-zipcode="75210"><span class="x-tooltip">Dallas, TX</span></li>
  <li data-zipcode="76710"><span class="x-tooltip">Waco, TX</span></li>
 </ul>
</div>

<script type="text/javascript">
 
 jQuery(document).ready(function() {

  jQuery("#cityList>li>span.x-tooltip").each(function() {

   var item = jQuery(this);

   item.wijtooltip({ content: item.parent().attr("data-zipcode") });

  });
    
 });

</script>

</body>
</html>

References

Wijmo - The Wijmo JavaScript and CSS files are available at the Wijmo website, as are the required jQuery files.

http://www.wijmo.com

Thursday, February 24, 2011

Create Linq To Entities Connection in Code

If you're like most people, you have several different database servers that you need to connect to and you want to be able to deploy an application to different environments while only changing configuration entries. Linq To Entities has a different connection string and offers a slightly different approach to configuring the connection.

First, the code...


private static EntityConnection connection()
{
SqlConnectionStringBuilder sqlBuilder = new SqlConnectionStringBuilder();
sqlBuilder.DataSource = System.Configuration.ConfigurationManager.AppSettings["DataSource"].ToString();
sqlBuilder.InitialCatalog = System.Configuration.ConfigurationManager.AppSettings["InitialCatalog"].ToString();
sqlBuilder.IntegratedSecurity = false;
sqlBuilder.UserID = System.Configuration.ConfigurationManager.AppSettings["UserID"].ToString();
sqlBuilder.Password = System.Configuration.ConfigurationManager.AppSettings["Password"].ToString();

EntityConnectionStringBuilder entityBuilder = new EntityConnectionStringBuilder();
entityBuilder.Provider = System.Configuration.ConfigurationManager.AppSettings["Provider"].ToString();
entityBuilder.ProviderConnectionString = sqlBuilder.ToString();
entityBuilder.Metadata = System.Configuration.ConfigurationManager.AppSettings["MetaData"].ToString();

EntityConnection entityConnection = new EntityConnection(entityBuilder.ToString());

return entityConnection;
}

The explanation...
First, create a SqlConnectionStringBuilder object. Next, assign the DataSource, InitialCatalog, User and Pass from values stored in the app.config. If you choose not to use Integrated Security set that property to false.

Now, create an EntityConnectionStringBuilder object. Assign the provider and metadata values. Assign the ProviderConnectionString property to the SqlConnectionStringBuilder.ToString() value.

Finally, create a new EntityConnection object and pass it the EntityConnectionStringBuilder.ToString() and you have yourself a new EntityConnection.

Wednesday, February 16, 2011

Adding HTML Content to Wijmo Tooltip with AJAX

In this post I will demonstrate how the Wijmo Tooltip widget can be used to display HTML content retrieved using AJAX.  Wijmo is a JavaScript widget library built on jQuery.  Parts of Wijmo, including the tooltip, are free/open-source.  This simple demo will display a list of cities.  When the mouse is hovered over a city a tooltip containing the temperature will be displayed.  The content of the tooltip is populated from HTML queried by jQuery's AJAX functions.

Here is a screen shot of the page viewed in the browser.


Next is the HTML markup, without the JavaScript used for the AJAX calls.

<!doctype html>
<html>
<head>
<title>Wijmo Tooltip AJAX Demo</title>
<link type="text/css" rel="stylesheet" href="jquery.ui.all.css">
<link type="text/css" rel="stylesheet" href="jquery.wijmo-open.1.1.2.css">
<script type="text/javascript" src="jquery-1.4.4.min.js"></script>
<script type="text/javascript" src="jquery-ui-1.8.7.custom.min.js"></script>
<script type="text/javascript" src="jquery.wijmo-open.1.1.2.min.js"></script>
</head>
<body>

<h1>Weather Tooltip via AJAX</h1>

<div>
<ul id="cityList">
<li data-zipcode="78701"><span class="x-tooltip">Austin, TX</span></li>
<li data-zipcode="75210"><span class="x-tooltip">Dallas, TX</span></li>
<li data-zipcode="76710"><span class="x-tooltip">Waco, TX</span></li>
</ul>
</div>


</body>
</html>

This is pretty simple markup. Note that I have used HTML 5 data-* attributes to associate a zip code with each list item element.  Also note that Wijmo has dependencies on jQuery JavaScript and CSS files which I have referenced in the head section.


Next is the JavaScript that is used to create the tooltips.
jQuery(document).ready(function() {
  jQuery("#cityList>li>span.x-tooltip").each(function() {

   jQuery(this).wijtooltip({

      ajaxCallback: function () {    

      var item = this;  // give this an alias so we can refer to it in scope of Ajax call below

      jQuery.ajax({
       url: "weather.aspx" 
       , data: { zipcode: item.parent().attr("data-zipcode")  } //get the zip code from the li wrapping the span
       , success : function(data) { item.wijtooltip("option", "content", data);  } 
       , dataType: 'html' 
       , type: "GET"
      });                  
                 } 
    });
  });
 });

The selector #cityList>li>span.x-tooltip is used to get the SPAN elements I wish to provide a tooltip for.  The ajaxCallback function option of the wijtooltip function is used to specify the AJAX call used to retrieve the HTML content and populate the tooltip content when the tooltipis shown. The data option of jQuery's ajax method gets the desired zip code value from the parent list item's data attribute.

Here is an example of the HTML resulting from a call to the weather.aspx page.

<!doctype html>
<html>
<head>
 <title>Weather</title>
</head>
<body>
Currently <span id="temp">63</span>&deg;
</body>
</html>


References
Wijmo - The Wijmo JavaScript and CSS files are available at the Wijmo website, as are the required jQuery files.
http://www.wijmo.com

Thursday, February 10, 2011

Removing a Background in Adobe Photoshop


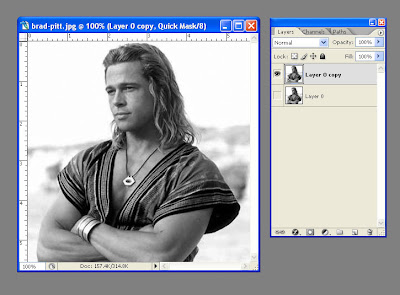
Open your picture in Photoshop. Copy the layer so that an original is kept safe, select the copied layer and press Q for Quick Mask mode.


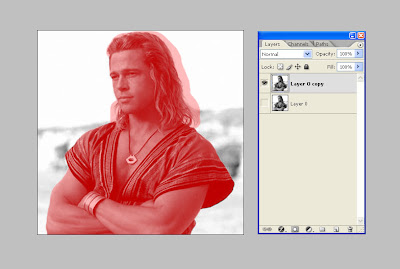
Select the color black from the color pallet, then select the brush tool. Color in the portion of the image that you would like to keep. Just mark a small area around the hair. I will take out the background behind the hair stands later.


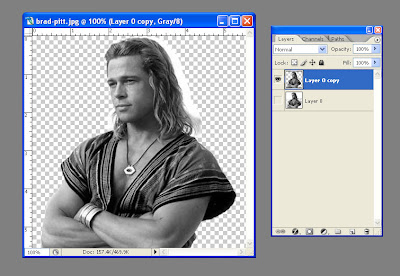
Select the Move tool, click on the unwanted portion of the image and press the Delete key. Deselect by choosing Select from the menu then click Deselect.


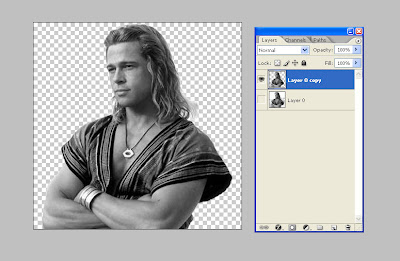
We can still see the background color through the stands of hair. It is time to get rid of that. Open the background eraser tool. With the Background Eraser selected, your mouse cursor will change into a circle with a small crosshair in the center of it. Click and hold the mouse down on the white portion around the hair and then run the mouse over the picture to get rid of the white color. Other colors of the image will not be affected.


The last step would be adding a background color. I’ve added a layer below the layer I have been working on and filled it with a gray color.


Tuesday, February 1, 2011

Can Scrum and Kanban Coexist?

There is much debate these days over which is better, Scrum or Kanban, but a better question would be how do you use the strengths of both to your advantage? To determine the answer we need to know the common elements of both concepts as well as the differences.

I talk about Scrum in some detail in an earlier entry, but Scrum in a nutshell is a way of breaking down complex problems into simpler solutions. Scrum uses self-organizing teams that make a commitment to stakeholders to create a unit of work that is shippable. Scrum teams are cross-functional and deal in iterations of shippable product.

Kanban is a Just-in-time concept originally developed by Toyota as a way to control production. Kanban is "pull-based" meaning that production is based on current demand and is usually based on a strict set of rules. An example of these rules from Toyota are as follows...
  1. Do not send defective products to the subsequent process
  2. Subsequent process only takes what it needs
  3. Produce only the exact quantity withdrawn
  4. Level the production
  5. Use Kanban as a means of fine-tuning
  6. Stabalize and Rationalize the process

I personally believe that Scrum and Kanban cannot only coexist, but can compliment each other well. For example, when an IT product is requested, Scrum is a good candidate for managing that creation. Use sprints to create shippable product and get customer feedback. Once the product is stable, the backlog tends to shrink, which is where I think Kanban comes in. As new requests are made, they can be handled in a just-in-time way. Dedicating a sprint to a simple feature request defeats the purpose of being agile. My Scrum master instructor mentioned that you don't always have to create a great meal, sometimes you just need to heat up some macaroni and cheese. So, if you're making macaroni, just make macaroni.

To recap, I like both Scrum and Kanban and we tend to use both here successfully. Generally, on larger projects we use Scrum, but that tends to evolve into Kanban over time as the project turns into a mature, finished product. Kanban is used as part of a continuous improvement process with a focus on quality.