Thursday, November 11, 2010

A Brief Introduction to Microsoft's Log Parser Tool

Microsoft provides the Log Parser tool free of charge.  This tool can be used to extract data from a variety of sources including IIS log files, the Windows event log, and Active Directory.  It can then transform the log data into another format such as XML or CSV or export the data to a database table.  Users can limit the data they want to retrieve by using SQL queries.  I will provide a quick example that selects and displays data from an IIS log file.


The first step to using the Log Parser tool is to download and install it.  You can find the installation file here: http://www.microsoft.com/downloads/en/details.aspx?FamilyID=890cd06b-abf8-4c25-91b2-f8d975cf8c07&displaylang=en.


After installing Log Parser open the command prompt and navigate the the directory where the LogParser.exe file was installed.  On my instance of Windows XP the tool was installed at C:\Program Files\Log Parser 2.2.  I have a local instance of IIS running a web site and I want to see what requests it has logged today.  I execute the command below.

 LogParser -i:IISW3C -o:DATAGRID "SELECT time, cs-method, cs-uri-stem FROM 'C:\WINDOWS\system32\Logfiles\W3SVC1\ex100924.log'"

The -i argument indicates the input format.  In this case the W3C log file format used by IIS.  The -o parameter indicates the output format.  In this case a datagrid.  The final argument is my query.  I have specified the fields I want returned in the SELECT clause and in the FROM clause I have provided the path to the log file I want to examine.  If I wanted to retrieve data from multiple log files I would use an asterisk  as a wildcard character.  To get all log files in the directory I would use:

'C:\WINDOWS\system32\Logfiles\W3SVC1\*.log'

You will also note that I have enclosed the path in single quotes since it contains spaces.


Here is a screen shot of the output.


References


Download Log Parser

http://www.microsoft.com/downloads/en/details.aspx?FamilyID=890cd06b-abf8-4c25-91b2-f8d975cf8c07&displaylang=en

The W3C Log File Format for IIS


Tuesday, November 9, 2010

Basic ASP.Net MVC Site


In this post I will demonstrate how easy it is to create an ASP MVC site with basic CRUD operations on the Chinook database.

  1. Start Visual Studio and create a new project using the ASP.Net MVC 2 template. I'm a proponent of Unit Testing, but for today's demo let's do not create the unit tests.
  2. Right-click the Models folder and select Add->New Item->Data->ADO.Net Entity Data Model.
  3. Name the Model Chinook.edmx and choose the Artists table to import into the model.
  4. Right-click the Controllers folder and select Add->Controller. Name the controller ArtistController and check the box to Add action methods for our CRUD operations.
  5. Next, In the Index function select all artists from the Artists table in the Chinook database like this...
public ActionResult Index()
{
using (ChinookEntities chinook = new ChinookEntities())
{
var allArtists = from artists in chinook.Artists
orderby artists.Name
select artists;

return View(allArtists.ToList());
}
}
  • Right-click "View(allArtists)" and select Add View->Check the box for Create Strongly-Typed View->Select ChinookArist.Models.Artist->Select List for View Content->Hit the Add button.
  • Now add a link to our controller in the Site.Master and we're ready to go.
  • Run the project and hit the link to Artists and you get a list of all artists in the table.


To add the details view to our project add the following snippet to the Details(int id) function in ArtistController.cs...

public ActionResult Details(int id)
{
using (ChinookEntities chinook = new ChinookEntities())
{
var artist = (from a in chinook.Artists
where a.ArtistId == id
select a).First();

return View(artist);
}
}
Next, right-click "Details" and select Add View. Be sure to select Details for our View content drop-down. Voila, a Details.aspx page is create for us.

Editing a record works in a similar manner. Add the following code to ArtistController...
public ActionResult Edit(int id)
{
using (ChinookEntities chinook = new ChinookEntities())
{
var artist = (from a in chinook.Artists
where a.ArtistId == id
select a).First();

return View(artist);
}
}

This will return the record to edit. Right-click the Edit and follow the steps to create and edit page. In addition, you will need the following which will actually perform the editing...
[HttpPost]
public ActionResult Edit(int id, FormCollection collection)
{
try
{
using (ChinookEntities chinook = new ChinookEntities())
{
var artist = (from a in chinook.Artists
where a.ArtistId == id
select a).First();

artist.Name = collection[1].ToString();
chinook.SaveChanges();
}
return RedirectToAction("Index");
}
catch
{
return View();
}
}


To creating a new record use the following...
[HttpPost]
public ActionResult Create(FormCollection collection)
{
try
{
using (ChinookEntities chinook = new ChinookEntities())
{
Artist artist = new Artist();
artist.Name = collection[0].ToString();
chinook.AddToArtists(artist);
chinook.SaveChanges();
}

return RedirectToAction("Index");
}
catch
{
return View();
}
}

Right-click Create and a new aspx page is created for us.

Deleting a record is similar to editing in that it requires two functions...
public ActionResult Delete(int id)
{
using (ChinookEntities chinook = new ChinookEntities())
{
var artist = (from a in chinook.Artists
where a.ArtistId == id
select a).First();

return View(artist);
}
}

and...

[HttpPost]
public ActionResult Delete(int id, FormCollection collection)
{
try
{
using (ChinookEntities chinook = new ChinookEntities())
{
var artist = (from a in chinook.Artists
where a.ArtistId == id
select a).First();
chinook.DeleteObject(artist);
chinook.SaveChanges();
}
return RedirectToAction("Index");
}
catch
{
return View();
}
}

Once again, right-clicking the Delete function and following the prompts will create a delete.aspx page for us.


In just a few minutes I have created a simple, yet fully functional MVC application with complete CRUD operations on a table.


Thursday, November 4, 2010

TSQL Delimited List From Rows

Using TSQL, at some point you may need to create a column that contains a list of values that are normally rows in SQL Server. This blog entry will show you how to do that using the Chinook database (available at http://chinookdatabase.codeplex.com).

For sake of argument let's return a list of artists from the Artist table. First, a simple select query will return the following results...


The following TSQL code will return our delimited results.

Declare @ArtistAlbum varchar(1000)
Select @ArtistAlbum = coalesce(@ArtistAlbum + ', ', '') + Artist.Name From Artist
Select @ArtistAlbum

Tuesday, November 2, 2010

Creating a Data-driven Subscription in Report Services

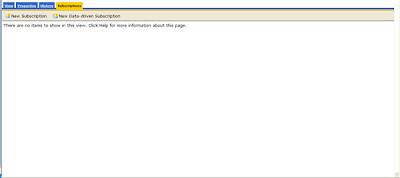
To create a data-driven subscription in Reporting Services select the report and click on the Subscriptions tab, then click the New Data-driven Subscription button.


Step 1.
You will be asked to enter a description and a format in which to deliver the report. As shown below I have chosen to e-mail the report. I have also chosen to specify a shared data source. Click the Next button.


Step 2.
Select the shared data source for your report and click the Next button.


Step 3.
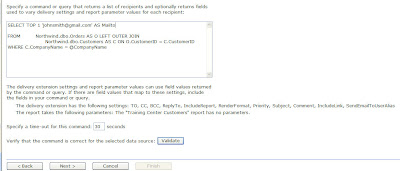
Since I only want to send this report if it contains data, I used SELECT TOP 1. I also specified an e-mail address to send the report to. The report will be sent to johnsmith@gmail.com. The rest of the select statement I copied from my original select statement that I used to create the report. Click the Validate button to make sure your sql is correct, then click the Next button.


Step 4.
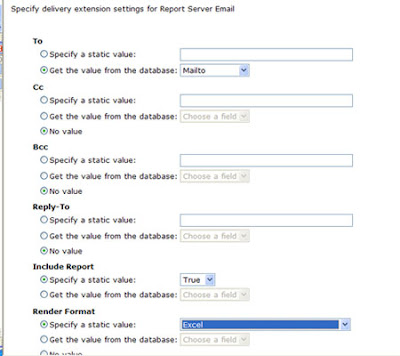
To send the e-mail to John Smith, choose the 'Get the value from the database:' radio button and select Mailto since that is the variable name used in the previous sql statement. Choose to include the report and select the format in which the user will view the report. I have chosen to send the user an Excel document. Click the Next button at the bottom of the page.


Step 5.
If the report contains parameters you will need to specify them at this time. They can be static variables or they can be chosen from the sql statement entered earlier.

Step 6.
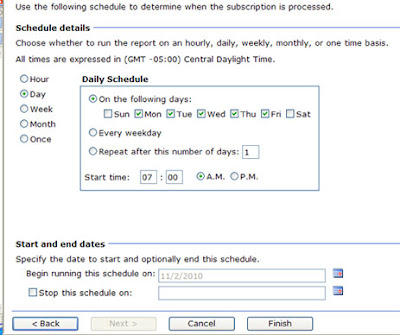
To set a schedule, click the ‘On a schedule created for this subscription’ radio button.


Step 7.
I have chosen to send this report Monday through Friday at 7:00 am. Click the Finished button.

Wednesday, October 27, 2010

Creating a Unit Test in C#

Unit testing allows a developer to isolate different functions or parts of an application and show that those parts are working correctly. There are many benefits to creating unit tests, but two of the most important ones to me are finding bugs early in the development cycle and increasing the refactor-ability of the application with ability to run tests at any time. I'll now walk through a simple project with a unit test.


First, create a project called UnitTesting using the Class Library project template. Next, add a class named UnitTest to the project and add the following code snippet to that class so that it appears as follows...


namespace
UnitTesting
{
public static class UnitTest
{
public static bool IsMsSqlSmallDateTime(this DateTime input)
{
//January 1, 1900, through June 6, 2079
return (input >= new DateTime(1900, 1, 1) && input <= new DateTime(2079, 6, 6));
}
}
}

Next, right-click on the function name and select "Create Unit Tests...". A new project is added to the solution with a class named UnitTestTest.cs. Running the test now will result in an Inconclusive result, therefore let's look at the test code in more detail. Change the test method to the following code and then rerun the test...

[TestMethod()]
public void IsMsSqlSmallDateTimeTestTooOld()
{
DateTime input = new DateTime();
input = Convert.ToDateTime("01/01/1899");

bool expected = false;
bool actual;
actual = UnitTest.IsMsSqlSmallDateTime(input);

Assert.AreEqual(expected, actual);
}

This method sets the input to a date we know to be older than a valid SQL date and calls our function. We are expecting a false return then we assert that our assumption and the function return the predicted results. You could also create the following tests to check for date that is too new and one that is just right...

[TestMethod()]
public void IsMsSqlSmallDateTimeTestTooYoung()
{
DateTime input = new DateTime();
input = Convert.ToDateTime("01/01/2080");

bool expected = false;
bool actual;
actual = UnitTest.IsMsSqlSmallDateTime(input);

Assert.AreEqual(expected, actual);
}

[TestMethod()]
public void IsMsSqlSmallDateTimeTestJustRight()
{
DateTime input = new DateTime();
input = System.DateTime.Now;

bool expected = true;
bool actual;
actual = UnitTest.IsMsSqlSmallDateTime(input);

Assert.AreEqual(expected, actual);
}

This has been a brief intro to unit test, I hope this helps out.

Monday, October 25, 2010

Adding Contacts Using the Android SDK

There are a number of good blogs about building Android apps, but Christophe Coenraets has one of the better ones out there right now. He builds a contact application in 6 projects that start off small and build in complexity. The final sample uses a SQLite database to feed the application. I will not rehash what he has done, but one thing I added was the ability to add the contact to the actual Android contacts applet using the code snippet below. As you can see this is straightforward and requires little code to implement.

Intent addContactIntent = new Intent();
addContactIntent.setAction(ContactsContract.Intents.SHOW_OR_CREATE_CONTACT);
addContactIntent.addCategory(Intent.CATEGORY_DEFAULT);
addContactIntent.setData(Uri.fromParts("tel", officeNumber, null));
addContactIntent.putExtra(ContactsContract.Intents.Insert.NAME, employeeNameText.getText());
addContactIntent.putExtra(ContactsContract.Intents.Insert.EMAIL, emailAddress);
this.startActivity(addContactIntent);


Another slight modification from the original work was to use a different icon for the launcher. There are three screen densities for the Android: Low, Medium and High. Low density (ldpi) uses a 36x36 px PNG file, Medium density (mdpi) uses 48x48 and High density (hdpi) uses 72x72. These three densities each have a folder in the project under the res folder. Simply dropping a png file named icon.png into each of these three folders will change the icon of your application. There is a table at developer.android.com as a reference.

Wednesday, October 20, 2010

Introduction to PDF File Creation in C# Using iTextSharp

There are numerous commercial and open source components that enable .NET developers to create PDF files.  I will be providing a brief introduction to using iTextSharp to create a PDF file using C#.  iTextSharp is an open source .NET library based on the iText Java library.  This post will provide some sample code using iTextSharp to create a PDF containing text entered using a Windows forms application.

Here is a screenshot of the user interface.


For the purpose of this sample I have added all of the program's logic to the "Create PDF" button.  Here is a walkthrough of the relevant code. You must download the iTextSharp DLL or compile it from the source code and add a reference before you will be able to use the iTextSharp namespace in your project.

Here is the C# code that does the work of creating a basic PDF file.  A complete Visual Studio solution containing a Windows Forms application is available to download as well.  The link is at the end of this post.


//name of file to create, since directory is not specified it will be created in the same directory as the program executable file
string fileName = "hello.pdf";

//create file object
System.IO.FileStream destinationFile = new System.IO.FileStream(fileName, System.IO.FileMode.Create);

//create a new pdf document
iTextSharp.text.Document pdfDocument = new iTextSharp.text.Document();

//associate document with file object
iTextSharp.text.pdf.PdfWriter.GetInstance(pdfDocument, destinationFile);

//must call open method before writing file content
pdfDocument.Open();

//loop through the lines input on the form
foreach (string source in this.sourceText.Lines)
{
    //create a block of text with the content of the line followed by a newline 
    iTextSharp.text.Phrase lineOfText = new iTextSharp.text.Phrase(source + "\n");

    //add block of text to PDF document
    pdfDocument.Add(lineOfText);
}

//close document object when we're done adding content
pdfDocument.Close();

//open pdf file in default PDF application
System.Diagnostics.Process.Start(fileName);


As you can see the code required to produce a basic PDF file is not too complicated.  

References

The iTextSharp library can be found at SourceForge:

The API documentation can be found at the link below.  Note that the documentation is for the Java version, but is useful to programmers using iTextSharp for .NET as well since the .NET library's API is based on the Java version.

The author of iText has published a book on the subject.  The book is based on the Java version of the library. 

You can download the Visual Studio project  file for the example at: