This is accomplished by editing StyleTemplates.xml which is located at
C:\Program Files\Microsoft Visual Studio 8\Common7\IDE\PrivateAssemblies\Business Intelligence Wizards\Reports\Styles\en
Make a backup of StyleTemplates.xml before starting. The StyleTemplate.xml is in the following format.
<styletemplates>
<styletemplate name="Template Name">
<label>Name that will be shown in wizard</label>
<styles>
<style name="Name of element to be styled">
[Elements from RDL Style.]
</style>
</styles>
</styletemplate>
</styletemplates>
To add a new template simply copy an old template by selecting all the tags between the </StyleTemplate Name></StyleTemplate> tags and paste after a </StyleTemplate> tag.
<StyleTemplate Name="Slate">
<Label>Slate</Label>
<Styles>
<Style Name="Title">
<FontFamily>Tahoma</FontFamily>
<FontSize>20pt</FontSize>
<Color>SteelBlue</Color>
<FontWeight>Bold</FontWeight>
</Style>
<Style Name="Page Group Level 1">
<FontFamily>Tahoma</FontFamily>
<FontSize>14pt</FontSize>
<Color>SlateGray</Color>
</Style>
<Style Name="Page Group Level 2">
<FontFamily>Tahoma</FontFamily>
<FontSize>12pt</FontSize>
</Style>
<Style Name="Page Group Level 3+">
<FontFamily>Tahoma</FontFamily>
<FontSize>10pt</FontSize>
</Style>
<Style Name="Table"></Style>
<Style Name="Matrix"></Style>
<Style Name="Table Header">
<BackgroundColor>SteelBlue</BackgroundColor>
<FontFamily>Tahoma</FontFamily>
<FontSize>11pt</FontSize>
<FontWeight>Bold</FontWeight>
<Color>White</Color>
<BorderStyle>
<Default>Solid</Default>
</BorderStyle>
<BorderColor>
<Default>LightGrey</Default>
</BorderColor>
</Style>
<Style Name="Group Level 1">
<FontFamily>Tahoma</FontFamily>
<FontSize>10pt</FontSize>
<FontWeight>Bold</FontWeight>
<Color>White</Color>
<BackgroundColor>#6e9eca</BackgroundColor>
<BorderStyle>
<Default>Solid</Default>
</BorderStyle>
<BorderColor>
<Default>LightGrey</Default>
</BorderColor>
</Style>
<Style Name="Group Level 1 Textbox">
<FontFamily>Tahoma</FontFamily>
<FontSize>10pt</FontSize>
<FontWeight>Bold</FontWeight>
<Color>White</Color>
<BackgroundColor>#6e9eca</BackgroundColor>
<BorderStyle>
<Default>Solid</Default>
</BorderStyle>
<BorderColor>
<Default>LightGrey</Default>
</BorderColor>
</Style>
<Style Name="Group Level 2">
<Color>White</Color>
<FontFamily>Tahoma</FontFamily>
<FontSize>10pt</FontSize>
<FontWeight>Bold</FontWeight>
<BackgroundColor>SlateGray</BackgroundColor>
<BorderStyle>
<Default>Solid</Default>
</BorderStyle>
<BorderColor>
<Default>LightGrey</Default>
</BorderColor>
</Style>
<Style Name="Group Level 2 Textbox">
<Color>White</Color>
<FontFamily>Tahoma</FontFamily>
<FontSize>10pt</FontSize>
<FontWeight>Bold</FontWeight>
<BackgroundColor>SlateGray</BackgroundColor>
<BorderStyle>
<Default>Solid</Default>
</BorderStyle>
<BorderColor>
<Default>LightGrey</Default>
</BorderColor>
</Style>
<Style Name="Group Level 3+">
<Color>White</Color>
<FontFamily>Tahoma</FontFamily>
<FontSize>10pt</FontSize>
<FontWeight>Bold</FontWeight>
<BackgroundColor>#8fa0b0</BackgroundColor>
<BorderStyle>
<Default>Solid</Default>
</BorderStyle>
<BorderColor>
<Default>LightGrey</Default>
</BorderColor>
</Style>
<Style Name="Group Level 3+ Textbox">
<Color>White</Color>
<FontFamily>Tahoma</FontFamily>
<FontSize>10pt</FontSize>
<FontWeight>Bold</FontWeight>
<BackgroundColor>#8fa0b0</BackgroundColor>
<BorderStyle>
<Default>Solid</Default>
</BorderStyle>
<BorderColor>
<Default>LightGrey</Default>
</BorderColor>
</Style>
<Style Name="Detail">
<FontFamily>Tahoma</FontFamily>
<FontSize>10pt</FontSize>
<BorderStyle>
<Default>Solid</Default>
</BorderStyle>
<BorderColor>
<Default>LightGrey</Default>
</BorderColor>
</Style>
</Styles>
</StyleTemplate>
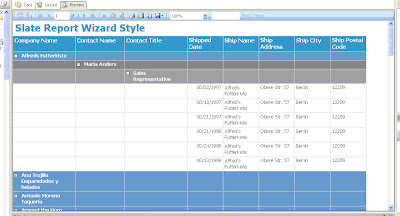
Produces a report that looks like this.

By modifying the xml file. You can change the colors, fonts and other elements to reflect your company’s color themes and styles.
I’ve added a style called SAMPLE to the StyleTemplates.xml
<StyleTemplate Name="SAMPLE">
<Label>SAMPLE</Label>
<Styles>
<Style Name="Title">
<FontFamily>Arial</FontFamily>
<FontSize>12pt</FontSize>
<Color>#000000</Color>
<FontWeight>Bold</FontWeight>
</Style>
<Style Name="Page Group Level 1">
<FontFamily>Arial</FontFamily>
<FontSize>10pt</FontSize>
<Color>#ebebeb</Color>
</Style>
<Style Name="Page Group Level 2">
<FontFamily>Arial</FontFamily>
<FontSize>10pt</FontSize>
</Style>
<Style Name="Page Group Level 3+">
<FontFamily>Arial</FontFamily>
<FontSize>8pt</FontSize>
</Style>
<Style Name="Table"></Style>
<Style Name="Matrix"></Style>
<Style Name="Table Header">
<BackgroundColor>#ebebeb</BackgroundColor>
<FontFamily>Arial</FontFamily>
<FontSize>10pt</FontSize>
<FontWeight>Bold</FontWeight>
<Color>#000000</Color>
<BorderStyle>
<Default>Solid</Default>
</BorderStyle>
<BorderColor>
<Default>#000000</Default>
</BorderColor>
</Style>
<Style Name="Group Level 1">
<FontFamily>Arial</FontFamily>
<FontSize>10pt</FontSize>
<FontWeight>Bold</FontWeight>
<Color>#000000</Color>
<BackgroundColor>#ebebeb</BackgroundColor>
<BorderStyle>
<Default>Solid</Default>
</BorderStyle>
<BorderColor>
<Default>#000000</Default>
</BorderColor>
</Style>
<Style Name="Group Level 1 Textbox">
<FontFamily>Arial</FontFamily>
<FontSize>10pt</FontSize>
<FontWeight>Bold</FontWeight>
<Color>#000000</Color>
<BackgroundColor>#ebebeb</BackgroundColor>
<BorderStyle>
<Default>Solid</Default>
</BorderStyle>
<BorderColor>
<Default>#000000</Default>
</BorderColor>
</Style>
<Style Name="Group Level 2">
<Color>White</Color>
<FontFamily>Arial</FontFamily>
<FontSize>10pt</FontSize>
<FontWeight>Bold</FontWeight>
<BackgroundColor>SlateGray</BackgroundColor>
<BorderStyle>
<Default>Solid</Default>
</BorderStyle>
<BorderColor>
<Default>#000000</Default>
</BorderColor>
</Style>
<Style Name="Group Level 2 Textbox">
<Color>White</Color>
<FontFamily>Arial</FontFamily>
<FontSize>10pt</FontSize>
<FontWeight>Bold</FontWeight>
<BackgroundColor>SlateGray</BackgroundColor>
<BorderStyle>
<Default>Solid</Default>
</BorderStyle>
<BorderColor>
<Default>#000000</Default>
</BorderColor>
</Style>
<Style Name="Group Level 3+">
<Color>White</Color>
<FontFamily>Tahoma</FontFamily>
<FontSize>10pt</FontSize>
<FontWeight>Bold</FontWeight>
<BackgroundColor>#8fa0b0</BackgroundColor>
<BorderStyle>
<Default>Solid</Default>
</BorderStyle>
<BorderColor>
<Default>#000000</Default>
</BorderColor>
</Style>
<Style Name="Group Level 3+ Textbox">
<Color>White</Color>
<FontFamily>Tahoma</FontFamily>
<FontSize>10pt</FontSize>
<FontWeight>Bold</FontWeight>
<BackgroundColor>#8fa0b0</BackgroundColor>
<BorderStyle>
<Default>Solid</Default>
</BorderStyle>
<BorderColor>
<Default>#000000</Default>
</BorderColor>
</Style>
<Style Name="Detail">
<FontFamily>Tahoma</FontFamily>
<FontSize>10pt</FontSize>
<BorderStyle>
<Default>Solid</Default>
</BorderStyle>
<BorderColor>
<Default>#000000</Default>
</BorderColor>
</Style>
</Styles>
</StyleTemplate>
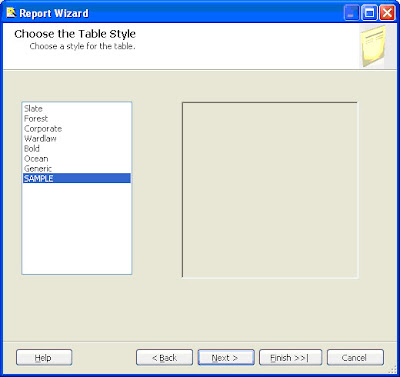
Once I have saved the file, I am ready to create a new report. Simply select the new report style from the report wizard.

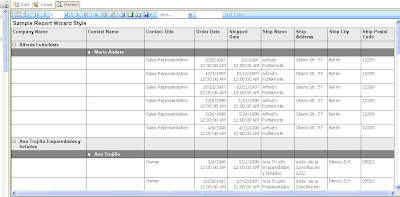
An example of the SAMPLE style report is below:

No comments:
Post a Comment