The 2007 version of Microsoft Office introduced new file formats for Word, Excel, and Access. If you need to connect to an Access 2007 database file, one with the "accdb" file extension, you will not be able to use the Access database drivers bundled with ColdFusion. These drivers are designed for the previous Access file format which used "mdb" as a file extension. In this post I will walk through creating a ColdFusion data source for an Access 2007 file. This process was tested on a Window 2003 server using ColdFusion 9.0.1 on a 32-bit machine.
Prerequisites
1. A ColdFusion installation which includes ODBC the optional services.
2. The Office 2007 System Driver package should be installed on your server. This will install the ODBC drivers for Access 2007. This may not be required if Office 2007 has been installed on the machine.
http://www.microsoft.com/downloads/en/details.aspx?familyid=7554f536-8c28-4598-9b72-ef94e038c891&displaylang=en
You must set up your data source twice. First an ODBC connection must be created in Windows, and second a data source must be created in the ColdFusion administrator.
Create the ODBC Connection in Windows
1. Open Control Panel > Administrative Tools > Data Sources (ODBC).
2. Select the System DSN tab.
3. Click Add...
4. In the Create New Data Source window Select Microsoft Access Driver (*.mdb, *.accdb), then click Finish.
5. In the ODBC Microsoft Access Setup window fill in the Data Source Name, then click Select...
6. In the Select Database window browse to the .accdb file you wish to use, then click OK.
7. In the ODBC Microsoft Access window click OK.
8. In the ODBC Data Source Administrator window click OK.
Create the Data Source in ColdFusion
1. Log into the ColdFusion administrator.
2. Open the Data & Services > Data Sources page.
3. Enter a Data Source Name and for Driver select ODBC Socket, then click Add.
4. On the Data & Services > Datasources > ODBC Socket page select your System DSN from the ODBC DSN list, then click Submit.
Conclusion
There a few caveats to be aware of. First, I have not tested this process with a password protected database. Second, Microsoft's Office 2007 drivers are not intended for use in a service or web application. I would not recommended the use of Access in a production system.
Thursday, January 27, 2011
Wednesday, January 19, 2011
Sitemaps in XML Format and Submission
A sitemap is a way of organizing a website, identifying the URLs and the data under each section. Its intended use is to allow search engines to track URLs more efficiently.
urlset tag - Encloses the file and references the current protocol standard.
loc tag - Contains the URL of a file.
proiority tag - List the priority of this URL compared to the other URLs on your site.
Sample Sitemap - click on code to make larger
This does not mean that Google has indexed your site yet, just that your sitemap has been submitted and accepted.
Bing
Ask
Yahoo
Again this does not mean that Yahoo has indexed your site, just that your sitemap has been submitted and accepted.
urlset tag - Encloses the file and references the current protocol standard.
loc tag - Contains the URL of a file.
proiority tag - List the priority of this URL compared to the other URLs on your site.
Sample Sitemap - click on code to make larger

As you can see from the XML above, the parent tag goes first followed by the child tags.
Escape Codes must be used for the characters below.
Submitting a Sitemap
Google
- www.google.com/webmasters/sitemaps
- To submit a sitemap to Google, to must first create a Google email account if you have not already done so.
- Click the “Add a site…” button and add your url.
- You will be asked to verify your site by either downloading a file and putting it in your wwwroot directory or by modifying your site index page by inserting a meta tag.
- Once your site is verified by Google, click on the “Site configuration” link.
- Click the Sitemaps link.
- Click the “Submit a Sitemap” button, entered the name of the site map at your root directory and click the “Submit Sitemap” button.
- Your status will show a clock for “pending”. The next day it will show a check mark for “ok”.
This does not mean that Google has indexed your site yet, just that your sitemap has been submitted and accepted.
Bing
- Bing does not accept sitemaps. They expect their web crawler to find your site.
Ask
- Ask does not have a sitemap submission form. To let Ask to know about your sitemap, you must use their ping service.
- Type in http://submissions.ask.com/ping?sitemap=http://www.NameOfSite.com/NameOfSitemap.xml in your browser.
Yahoo
- Yahoo works much the same way that Google does. Go to https://siteexplorer.search.yahoo.com/submit/
- Enter your url (ex: www.wardlawclaims.com) and click the “Submit URL” button.
- You will be asked to create a yahoo email account if you don’t already have one.
- Click on the “Submit a Website or Webpage” link.
- As with Google you will be asked to download a file to your wwwroot directory or insert a meta tag to your index page.
- Once your website has been verified. Click the “Feeds” link, type the name
of you xml sitemap file and click the “Add Feed” button. - Your status will show pending until it has been submitted to Microsoft then a check mark will be (usually the next day) display when it has been processed.
Again this does not mean that Yahoo has indexed your site, just that your sitemap has been submitted and accepted.
Wednesday, January 12, 2011
Facade Pattern in C#
O'Reilly's modern classic Head First Design Patterns describes the Facade pattern as a unified interface to a set of interfaces in a subsystem. Facade defines a higher-level interface that makes the subsystem easier to use.
This pattern is nothing revolutionary and something that all programmers have done at some point, but it is good to have a common name to go by. Today I will demonstrate how to create and remove groups in Active Directory by building a facade.
First, start Visual Studio and create a new project using the class library template. Once created, add a reference to ActiveDs in the project. Next, add a new class named ActiveDirectoryFacade.cs and add Using System.DirectoryServices to that class. Now, add the following function to create a group...
...and add the following function to remove a group...
We have just created a facade to add and remove Active Directory Groups with two functions. We can now use these functions in our applications.
This pattern is nothing revolutionary and something that all programmers have done at some point, but it is good to have a common name to go by. Today I will demonstrate how to create and remove groups in Active Directory by building a facade.
First, start Visual Studio and create a new project using the class library template. Once created, add a reference to ActiveDs in the project. Next, add a new class named ActiveDirectoryFacade.cs and add Using System.DirectoryServices to that class. Now, add the following function to create a group...
   public static bool CreateGroup(string groupName, out string result)
      {
         bool returnValue = false;
         result = "";

         try
         {
             DirectoryEntry groups = new DirectoryEntry();
             groups.Path = "LDAP://ldap/OU=EmailGroups,DC=yourdomain,DC=com";
             groups.AuthenticationType = AuthenticationTypes.Secure;

             DirectoryEntry group = groups.Children.Add(String.Format("CN={0}", groupName), "group");
             group.Properties["groupType"].Value = ActiveDs.ADS_GROUP_TYPE_ENUM.ADS_GROUP_TYPE_GLOBAL_GROUP;
             group.Properties["mail"].Value = String.Format("{0}@yourdomain.com", groupName);
             group.CommitChanges();

             result = String.Format("Successfully created distribution list {0}", groupName);
             returnValue = true;
         }
         catch (Exception ex)
         {
             result = ex.Message;
             returnValue = false;
         }

         return returnValue;
     }
...and add the following function to remove a group...
     public static bool RemoveGroup(string groupName, out string result)
     {
         bool returnValue = false;
         result = "";

         try
         {
             DirectoryEntry groups = new DirectoryEntry();
             groups.Path = "LDAP://ldap/OU=EmailGroups,DC=yourdomain,DC=com";
             groups.AuthenticationType = AuthenticationTypes.Secure;

             DirectoryEntry group = groups.Children.Find(String.Format("CN={0}", groupName));
             if (group != null)
             {
                 groups.Children.Remove(group);
                 group.CommitChanges();
             }

             result = String.Format("Successfully removed distribution list {0}", groupName);
             returnValue = true;
         }
         catch (Exception ex)
         {
             result = ex.Message;
             returnValue = false;
         }

         return returnValue;
     }
We have just created a facade to add and remove Active Directory Groups with two functions. We can now use these functions in our applications.
Wednesday, December 22, 2010
The Select Form Element in jQuery Mobile
The jQuery Mobile (JQM) framework includes a set of CSS, images, and JavaScript based behaviors that override the default look and behavior of form elements. In this blog post I will discuss the select control. I think the jQuery team has done an excellent job overall with the jQuery Mobile framework and that I am currently working with an alpha version, not a final release of the code.
The JQM select control works by replacing a standard HTML select element with a jQuery widget. This widget removes HTML select control by placing it outside the visible area of the browser window using CSS positioning. Below is the CSS snipet in question. It can be found in the jquery.mobile-1.0a2.css file.
The select element is then replaced by the mobile.selectmenu defined in the jquery.mobile-1.0a2.js file. The select element is replaced by a style anchor tag and the select's options are moved into an unordered list. The unordered list is displayed as a modal dialog when the anchor is clicked.
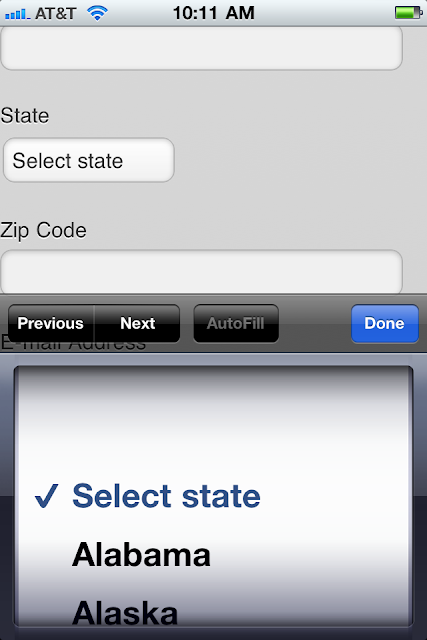
Here is a screen shot of a jQuery Mobile select widget that allows a user to select a U.S. state.

Here is the model dialog that displays the select options.

As you can see the implementation is visually very attractive, in my opinion. However the alpha implementation seems buggy. In my experience the when the options modal dialog is closed the form page sometimes moves to the top rather than displaying the area that visible when the select anchor was clicked. Mobile browser makers have done a good job making select controls easy to use and there isn't a significant benefit to be gained from re-implementing the select control.
In order to restore the default select element I have created a very basic patch that will override the JQM widget. Below is the relevant code which needs to be invoked in the document ready event. I have provided a link to a page that contains an example of the replacement widget including the JavaScript code at the end of this post.
Below is a screen shot of the resulting page. The select element uses the default behavior for the Safari browser. The control has also been styled to appear similar to the input controls on the form. Please note that the code above is intended as a proof of concept, use at your own risk.
References
jQuery Mobile Project
http://jquerymobile.com
Page which uses jQuery Select Element
http://www.customdatasys.com/jqm/v1/form.html
Page which uses the patch
http://www.customdatasys.com/jqm/v1/form-modselect.html
The JQM select control works by replacing a standard HTML select element with a jQuery widget. This widget removes HTML select control by placing it outside the visible area of the browser window using CSS positioning. Below is the CSS snipet in question. It can be found in the jquery.mobile-1.0a2.css file.
.ui-select select { position: absolute; left: -99999px; }
The select element is then replaced by the mobile.selectmenu defined in the jquery.mobile-1.0a2.js file. The select element is replaced by a style anchor tag and the select's options are moved into an unordered list. The unordered list is displayed as a modal dialog when the anchor is clicked.
Here is a screen shot of a jQuery Mobile select widget that allows a user to select a U.S. state.

Here is the model dialog that displays the select options.

As you can see the implementation is visually very attractive, in my opinion. However the alpha implementation seems buggy. In my experience the when the options modal dialog is closed the form page sometimes moves to the top rather than displaying the area that visible when the select anchor was clicked. Mobile browser makers have done a good job making select controls easy to use and there isn't a significant benefit to be gained from re-implementing the select control.
In order to restore the default select element I have created a very basic patch that will override the JQM widget. Below is the relevant code which needs to be invoked in the document ready event. I have provided a link to a page that contains an example of the replacement widget including the JavaScript code at the end of this post.
jQuery.widget( "mobile.selectmenu", $.mobile.widget, {

 options: {

  theme: null

 }, //end options


 _create: function(){

  var select = this.element,

   o = this.options,

   theme = o.theme;


  //get parent's theme

  if ( !theme ) {

   var themedParent = this.element.closest("[class*='ui-bar-'],[class*='ui-body-']");

   theme = themedParent.length ?

   /ui-(bar|body)-([a-z])/.exec( themedParent.attr("class") )[2] :

   "c";

  }


  //apply styling to label

   selectID = select.attr( "id" );

  label = $( "label[for="+ selectID +"]" ).addClass( "ui-select" );

  select.addClass("ui-corner-all ui-shadow-inset ui-body-null ui-body-" + theme);


  //apply additional styles/markup to more closly match select element with input elements

  select.css("font-size", "100%");

  select.css("padding", ".4em");

  select.wrap('');

  select.css("margin-bottom",".3em");


 } //end _create function

});
Below is a screen shot of the resulting page. The select element uses the default behavior for the Safari browser. The control has also been styled to appear similar to the input controls on the form. Please note that the code above is intended as a proof of concept, use at your own risk.

References
jQuery Mobile Project
http://jquerymobile.com
Page which uses jQuery Select Element
http://www.customdatasys.com/jqm/v1/form.html
Page which uses the patch
http://www.customdatasys.com/jqm/v1/form-modselect.html
Tuesday, December 21, 2010
Using jQuery Mobile on a Form Page
In this post I will be marking up a web page that contains a form for use with the jQuery Mobile (JQM) Framework. This post is part of a series of in which I convert a simple site form managing contacts consisting of several XHTML pages to HTML 5 pages which use JQM.
The page I will be using in this demonstration simulates the data entry page for adding a new contact. It contains the usual form controls: text boxes, checkboxes, radio buttons, and a select element. Here is a screen shot of the original (non-JQM) XHTML page in the iPhone 4 Safari browser.

Here is the XHTML markup.
<!DOCTYPE html PUBLIC "-//W3C//DTD XHTML Basic 1.1//EN"

    "http://www.w3.org/TR/xhtml-basic/xhtml-basic11.dtd">

<html xmlns="http://www.w3.org/1999/xhtml">

<head>

 <title>A Simple Site | New Entry</title>

</head>

<body>

<div>

<a href="index.html">Contact List</a> || <a href="form.html">New Entry</a><br />

</div>


<h1>New Entry</h1>


<form method="post" action="result.html">


 <fieldset>

  <legend>Contact Type</legend>


  <input type="checkbox" id="isBusiness" name="isBusiness" value="yes" /><label for="isBusiness">Is a Business Contact</label><br />

  <input type="checkbox" id="isPersonal" name="isPersonal" value="yes" /><label for="isPersonal">Is a Personal Contact</label><br />


 </fieldset>


 <fieldset>

  <legend>Name & Organization</legend>


  <label for="lastName">Last Name</label><br />

  <input name="lastName" id="lastName" type="text" /><br />


  <label for="firstName">First Name</label><br />

  <input name="firstName" id="firstName" type="text" /><br />


  <label>Salutation</label><br />

  <input id="salutation-mr" name="salutation" value="Mr." type="radio" /> <label for="salutation-mr">Mr.</label>

  <input id="salutation-ms" name="salutation" value="Ms." type="radio" /> <label for="salutation-ms">Ms.</label>

  <input id="salutation-dr" name="salutation" value="Dr." type="radio" /> <label for="salutation-dr">Dr.</label><br />


  <label for="organization">Organization</label><br />

  <input name="organization" id="organization" type="text" /><br />


 </fieldset>


 <fieldset>

  <legend>Phone Numbers</legend>


  <label for="mobilePhone">Mobile Phone</label><br />

  <input name="mobilePhone" id="mobilePhone" type="text" /><br />


  <label for="workPhone">Work Phone</label><br />

  <input name="workPhone" id="workPhone" type="text" /><br />


  <label for="homePhone">Home Phone</label><br />

  <input name="homePhone" id="homePhone" type="text" /><br />


 </fieldset>


 <fieldset>

  <legend>Address</legend>


  <label for="street">Street</label><br />

  <input name="street" id="street" type="text" /><br />


  <label for="city">City</label><br />

  <input name="city" id="city" type="text" /><br />


  <label for="state">State</label><br />

  <select name="state" id="state">

   <option value=""></option>

   <option value="AL">Alabama</option>

   <option value="AK">Alaska</option>

   <option value="AZ">Arizona</option>

   <option value="AR">Arkansas</option>

   <option value="CA">California</option>

   <option value="CO">Colorado</option>

   <option value="CT">Connecticut</option>

   <option value="DE">Delaware</option>

   <option value="FL">Florida</option>

   <option value="GA">Georgia</option>

   <option value="HI">Hawaii</option>

   <option value="ID">Idaho</option>

   <option value="IL">Illinois</option>

   <option value="IN">Indiana</option>

   <option value="IA">Iowa</option>

   <option value="KS">Kansas</option>

   <option value="KY">Kentucky</option>

   <option value="LA">Louisiana</option>

   <option value="ME">Maine</option>

   <option value="MD">Maryland</option>

   <option value="MA">Massachusetts</option>

   <option value="MI">Michigan</option>

   <option value="MN">Minnesota</option>

   <option value="MS">Mississippi</option>

   <option value="MO">Missouri</option>

   <option value="MT">Montana</option>

   <option value="NE">Nebraska</option>

   <option value="NV">Nevada</option>

   <option value="NH">New Hampshire</option>

   <option value="NJ">New Jersey</option>

   <option value="NM">New Mexico</option>

   <option value="NY">New York</option>

   <option value="NC">North Carolina</option>

   <option value="ND">North Dakota</option>

   <option value="OH">Ohio</option>

   <option value="OK">Oklahoma</option>

   <option value="OR">Oregon</option>

   <option value="PA">Pennsyvania</option>

   <option value="RI">Rhode Island</option>

   <option value="SC">South Carolina</option>

   <option value="SD">South Dakota</option>

   <option value="TN">Tennessee</option>

   <option value="TX">Texas</option>

   <option value="UT">Utah</option>

   <option value="VT">Vermont</option>

   <option value="VA">Virginia</option>

   <option value="WA">Washington</option>

   <option value="DC">Washington DC</option>

   <option value="WV">West Virginia</option>

   <option value="WI">Wisconsin</option>

   <option value="WY">Wyoming</option>

  </select><br />


  <label for="zipCode">Zip Code</label><br />

  <input name="zipCode" id="zipCode" type="text" /><br />


  <label for="emailAddress">E-mail Address</label><br />

  <input name="emailAddress" id="emailAddress" type="text" /><br />


  <label for="webSite">Web Site</label><br />

  <input name="webSite" id="webSite" type="text" /><br />


 </fieldset>


 <fieldset>

  <legend>Personal Information</legend>


  <label for="birthday">Birthday</label><br />

  <input name="birthday" id="birthday" type="text" /><br />


  <label for="spouse">Spouse</label><br />

  <input name="spouse" id="spouse" type="text" /><br />


  <label for="notes">Notes</label><br />

  <textarea id="notes" name="notes" rows="15" cols="35"></textarea>


 </fieldset>


 <div>

  <input type="submit" value="Save" /> <input type="reset" value="Cancel" />

 </div>


</form>


</body>

</html>
Here is a screen shot of the JQM version of the page in the iPhone 4 Safari browser.

Here is the markup for the jQuery Moblie version of the page.
<!doctype html> <!-- use HTML 5 doctype -->

<html>

<head>

 <title>A Simple Site | New Entry</title>


 <!-- CSS and scripts required for jQuery mobile -->

 <link rel="stylesheet" href="jquery.mobile-1.0a2.css" />

 <script type="text/javascript" src="jquery-1.4.4.js"></script>


 <!-- disable jQuerymobile's default AJAX page navigation, so that hyperlinks work as usual

 see: http://jquerymobile.com/demos/1.0a2/docs/api/globalconfig.html

 -->

 <script type="text/javascript" src="custom-mobile-config.js"></script>


 <script type="text/javascript" src="jquery.mobile-1.0a2.js"></script>


</head>

<body>

<div data-role="page" data-theme="b">


 <div data-role="header">

  <div data-role="navbar">

   <ul>

    <li><a href="index.html">Contacts List</a></li>

    <li><a href="form.html">New Entry</a></li>

   </ul>

  </div> <!-- end navbar -->


  <h1>New Entry</h1>

 </div><!-- end header -->


 <form method="get" action="detail.html"> <!-- this would normally post, however for this demo we'll merely GET the detail page -->


  <!-- add data-role="fieldcontain" and "controlgroup" for form styling -->

  <div data-role="fieldcontain">


   <fieldset data-role="controlgroup">

    <legend>Contact Type</legend>


     <input type="checkbox" id="isBusiness" name="isBusiness" value="yes" /><label for="isBusiness">Is a Business Contact</label>

     <input type="checkbox" id="isPersonal" name="isPersonal" value="yes" /><label for="isPersonal">Is a Personal Contact</label>

   </fieldset>


   <fieldset data-role="controlgroup">

    <legend>Name & Organization</legend>


    <label for="lastName">Last Name</label>

    <input name="lastName" id="lastName" type="text" /><br />


    <label for="firstName">First Name</label>

    <input name="firstName" id="firstName" type="text" /><br />


    <label>Salutation</label>

    <input id="salutation-mr" name="salutation" value="Mr." type="radio" /> <label for="salutation-mr">Mr.</label>

    <input id="salutation-ms" name="salutation" value="Ms." type="radio" /> <label for="salutation-ms">Ms.</label>

    <input id="salutation-dr" name="salutation" value="Dr." type="radio" /> <label for="salutation-dr">Dr.</label><br />


    <label for="organization">Organization</label> <!-- in landscape on iPhone end of this text will be hidden under the textbox, a possible work-around is to style labels with style="display: block;" -->

    <input name="organization" id="organization" type="text" /><br />


   </fieldset>


   <fieldset data-role="controlgroup">

    <legend>Phone Numbers</legend>


    <label for="mobilePhone">Mobile Phone</label>

    <input name="mobilePhone" id="mobilePhone" type="tel" /><br /><!-- input type to HTML 'tel' -->


    <label for="workPhone">Work Phone</label>

    <input name="workPhone" id="workPhone" type="tel" /><br /><!-- input type to HTML 'tel' -->


    <label for="homePhone">Home Phone</label>

    <input name="homePhone" id="homePhone" type="tel" /><br /><!-- input type to HTML 'tel' -->


   </fieldset>


   <fieldset data-role="controlgroup">

    <legend>Address</legend>


    <label for="street">Street</label>

    <input name="street" id="street" type="text" /><br />


    <label for="city">City</label>

    <input name="city" id="city" type="text" /><br />

    <label for="state">State</label>

    <select name="state" id="state">

     <option value="">Select state</option>

     <option value="AL">Alabama</option>

     <option value="AK">Alaska</option>

     <option value="AZ">Arizona</option>

     <option value="AR">Arkansas</option>

     <option value="CA">California</option>

     <option value="CO">Colorado</option>

     <option value="CT">Connecticut</option>

     <option value="DE">Delaware</option>

     <option value="FL">Florida</option>

     <option value="GA">Georgia</option>

     <option value="HI">Hawaii</option>

     <option value="ID">Idaho</option>

     <option value="IL">Illinois</option>

     <option value="IN">Indiana</option>

     <option value="IA">Iowa</option>

     <option value="KS">Kansas</option>

     <option value="KY">Kentucky</option>

     <option value="LA">Louisiana</option>

     <option value="ME">Maine</option>

     <option value="MD">Maryland</option>

     <option value="MA">Massachusetts</option>

     <option value="MI">Michigan</option>

     <option value="MN">Minnesota</option>

     <option value="MS">Mississippi</option>

     <option value="MO">Missouri</option>

     <option value="MT">Montana</option>

     <option value="NE">Nebraska</option>

     <option value="NV">Nevada</option>

     <option value="NH">New Hampshire</option>

     <option value="NJ">New Jersey</option>

     <option value="NM">New Mexico</option>

     <option value="NY">New York</option>

     <option value="NC">North Carolina</option>

     <option value="ND">North Dakota</option>

     <option value="OH">Ohio</option>

     <option value="OK">Oklahoma</option>

     <option value="OR">Oregon</option>

     <option value="PA">Pennsyvania</option>

     <option value="RI">Rhode Island</option>

     <option value="SC">South Carolina</option>

     <option value="SD">South Dakota</option>

     <option value="TN">Tennessee</option>

     <option value="TX">Texas</option>

     <option value="UT">Utah</option>

     <option value="VT">Vermont</option>

     <option value="VA">Virginia</option>

     <option value="WA">Washington</option>

     <option value="DC">Washington DC</option>

     <option value="WV">West Virginia</option>

     <option value="WI">Wisconsin</option>

     <option value="WY">Wyoming</option>

    </select><br />


    <label for="zipCode">Zip Code</label>

    <input name="zipCode" id="zipCode" type="text" /><br />


    <label for="emailAddress">E-mail Address</label>

    <input name="emailAddress" id="emailAddress" type="email" /><br /> <!-- input type to HTML 'email' -->


    <label for="webSite">Web Site</label>

    <input name="webSite" id="webSite" type="url" /><br /> <!-- input type to HTML 'url' -->


   </fieldset>


   <fieldset data-role="controlgroup">

    <legend>Personal Information</legend>


    <label for="birthday">Birthday</label>

    <input name="birthday" id="birthday" type="date" /><br /><!-- input type to HTML 'date' -->


    <label for="spouse">Spouse</label>

    <input name="spouse" id="spouse" type="text" /><br />


    <label for="notes">Notes</label>

    <textarea id="notes" name="notes" rows="15" cols="35"></textarea>


   </fieldset>

   <fieldset class="ui-grid-a"> <!-- use two column layout here, also add explicit themes to make buttons look different from each other -->

    <div class="ui-block-a"><input type="submit" value="Save" data-theme="b" /></div>

    <div class="ui-block-b"><input type="reset" value="Cancel" data-theme="a"  /></div>

   </fieldset>


  </div> <!-- end fieldcontain -->

 </form>

</div> <!-- end page div -->

</body>

</html>
To add JQM to the page the doctype has been changed to HTML 5 and the JQM CSS and JavaScript files have been added. This has been covered in a previous post. The code above contains some form specific changes. The contents of the form have been wrapped in a div with a data-role of "fieldcontain". This will apply form related changes to the content. Each fieldset has a data-role of "controlgroup". This change is needed to group the contained checkboxes and radio buttons together by specifying that they are in related grouping. For the submit and reset buttons I've added a ui-grid and ui-block classes to the markup that will render the fieldset in a two column layout. The ui-grid defines the wrapped and the ui-block-a and b specify the content of the columns. I've given the buttons themselves explicit data-theme attributes so they will appear visually distinct from one another.
Some form input text box elements have been changed to HTML 5 specific form elements that replace the usual "text" input type. Text boxes that will be used to enter telephone numbers have a type of "tel". Those that are used for an email address have a type of "email" and so forth. Ideally the browser would render a datepicker for "date" inputs, allow only URLs in a "url" input and limit the data entered to the appropriate type. Based on my testing in iPhone and Safari it appears that "tel" will result in numbers keypad rather than the QWERTY keypad being used for data entry, but the other types are not supported.
References
jQuery Mobile Project
http://jquerymobile.com
XHTML version of the page used in this post
http://www.customdatasys.com/jqm/start/form.html
The HTML 5 / JQM version of the page used in this post http://www.customdatasys.com/jqm/v1/form.html
HTML 5 Input Types
http://www.w3.org/TR/html5/the-input-element.html#attr-input-type
Monday, December 20, 2010
Using jQuery Mobile Collapsible Sections
In this post I will be adding collapsible sections to a mobile web page using the jQuery Mobile (JQM) framework. This post is part of a series of in which I convert a simple site form managing contacts consisting of several XHTML pages to HTML 5 pages which use JQM.
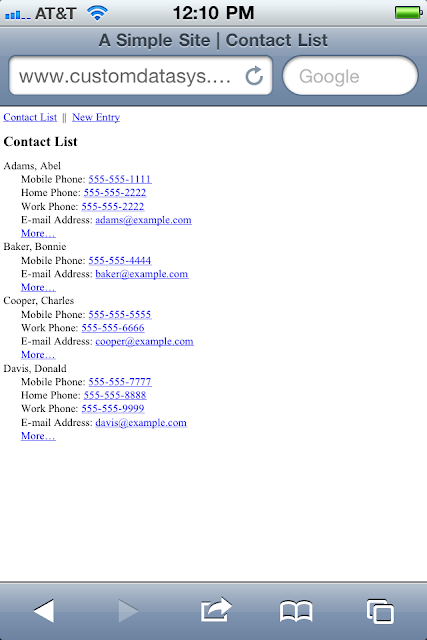
The page I will be using in this demonstration is the home page for the contacts web site. It displays a list of contacts and links to other pages on the site. Here is a screen shot of the XHTML page in the iPhone 4 Safari browser.
Next is the XHTML for the page.
Here is screen shot of the HTML5/JQM version of the page.

References
jQuery Mobile Project
http://jquerymobile.com
XHTML version of the page used in this post
http://www.customdatasys.com/jqm/start/index.html
The HTML 5 / JQM version of the page used in this post
http://www.customdatasys.com/jqm/v1/index.html
The page I will be using in this demonstration is the home page for the contacts web site. It displays a list of contacts and links to other pages on the site. Here is a screen shot of the XHTML page in the iPhone 4 Safari browser.

Next is the XHTML for the page.
<!DOCTYPE html PUBLIC "-//W3C//DTD XHTML Basic 1.1//EN"

    "http://www.w3.org/TR/xhtml-basic/xhtml-basic11.dtd">

<html xmlns="http://www.w3.org/1999/xhtml">

<head>

 <title>A Simple Site | Contact List</title>

</head>

<body>

<div>

<a href="index.html">Contact List</a>  ||  <a href="form.html">New Entry</a><br />

</div>


<h1>Contact List</h1>


<dl>

 <dt>Adams, Abel</dt>

 <dd>

  Mobile Phone: <a href="tel:555-555-1111">555-555-1111</a><br />

  Home Phone: <a href="tel:555-555-2222">555-555-2222</a><br />

  Work Phone: <a href="tel:555-555-3333">555-555-2222</a><br />

  E-mail Address: <a href="mailto:adams@example.com">adams@example.com</a><br />

  <a href="detail.html">More…</a>

 </dd>


 <dt>Baker, Bonnie</dt>

 <dd>

  Mobile Phone: <a href="tel:555-555-4444">555-555-4444</a><br />

  E-mail Address: <a href="mailto:baker@example.com">baker@example.com</a><br />

  <a href="detail.html">More…</a>

 </dd>


 <dt>Cooper, Charles</dt>

 <dd>

  Mobile Phone: <a href="tel:555-555-5555">555-555-5555</a><br />

  Work Phone: <a href="tel:555-555-6666">555-555-6666</a><br />

  E-mail Address: <a href="mailto:cooper@example.com">cooper@example.com</a><br />

  <a href="detail.html">More…</a>

 </dd>


 <dt>Davis, Donald</dt>

 <dd>

  Mobile Phone: <a href="tel:555-555-7777">555-555-7777</a><br />

  Home Phone: <a href="tel:555-555-8888">555-555-8888</a><br />

  Work Phone: <a href="tel:555-555-9999">555-555-9999</a><br />

  E-mail Address: <a href="mailto:davis@example.com">davis@example.com</a><br />

  <a href="detail.html">More…</a>

 </dd>


</dl>

</body>

</html>
Here is screen shot of the HTML5/JQM version of the page.

<!doctype html>

<html>

<head>

 <title>A Simple Site | Contact List</title>

 <link rel="stylesheet" href="jquery.mobile-1.0a2.css" />

 <script type="text/javascript" src="jquery-1.4.4.js"></script>

 <script type="text/javascript" src="custom-mobile-config.js"></script>

 <script type="text/javascript" src="jquery.mobile-1.0a2.js"></script>

</head>

<body>


<div data-role="page" data-theme="b">

 <div data-role="header">

  <div data-role="navbar">

   <ul>

    <li><a href="index.html">Contacts List</a></li>

    <li><a href="form.html">New Entry</a></li>

   </ul>

  </div>


  <h1>Contact List</h1>

 </div>


 <div data-role="content">


  <!-- put contacts in collapsable sections -->

  <div data-role="collapsible">

   <h2>Adams, Abel</h2>

   Mobile Phone: <a href="tel:555-555-1111">555-555-1111</a><br />

   Home Phone: <a href="tel:555-555-2222">555-555-2222</a><br />

   Work Phone: <a href="tel:555-555-3333">555-555-2222</a><br />

   E-mail Address: <a href="mailto:adams@example.com">adams@example.com</a><br />

   <a href="detail.html">More…</a>

  </div>


  <div data-role="collapsible">

   <h2>Baker, Bonnie</h2>

   Mobile Phone: <a href="tel:555-555-4444">555-555-4444</a><br />

   E-mail Address: <a href="mailto:baker@example.com">baker@example.com</a><br />

   <a href="detail.html">More…</a>

  </div>


  <div data-role="collapsible">

   <h2>Cooper, Charles</h2>

   Mobile Phone: <a href="tel:555-555-5555">555-555-5555</a><br />

   Work Phone: <a href="tel:555-555-6666">555-555-6666</a><br />

   E-mail Address: <a href="mailto:cooper@example.com">cooper@example.com</a><br />

   <a href="detail.html">More…</a>

  </div>


  <div data-role="collapsible">

   <h2>Davis, Donald</h2>

   Mobile Phone: <a href="tel:555-555-7777">555-555-7777</a><br />

   Home Phone: <a href="tel:555-555-8888">555-555-8888</a><br />

   Work Phone: <a href="tel:555-555-9999">555-555-9999</a><br />

   E-mail Address: <a href="mailto:davis@example.com">davis@example.com</a><br />

   <a href="detail.html">More…</a>

  </div>

 </div>

</div>

</body>

</html>
I have already covered the basic of add the necessary JavaScript, CSS, and HTML 5 markup to a page in order to use JQM. In this post I will focus how I have placed each contact record within a collapsible region. This is accomplished by wrapping each contact record within a div that has a data-role attribute of "collapsible". This replaces the definition list tags (dl, dt, dd) used to markup the XHTML version of the page. Within each div is a h2 heading tag that contains the text that will act as the label for each record. Clicking these labels toggles the show/hide feature of each region. The icons, label, and behavior has automatically been added by jQuery Mobile.References
jQuery Mobile Project
http://jquerymobile.com
XHTML version of the page used in this post
http://www.customdatasys.com/jqm/start/index.html
The HTML 5 / JQM version of the page used in this post
http://www.customdatasys.com/jqm/v1/index.html
Friday, December 17, 2010
Adding jQuery Mobile to a Web Page
In this post I walk through the changes needed to change a simple mobile web page from an XHTML page to an HTML 5 page that uses jQuery Mobile (JQM). This is the second in a series of blog posts in which I am exploring jQuery Mobile using the Alpha 2 release. This first post in the series can be found at: http://wardlawclaims.blogspot.com/2010/12/introduction-to-jquery-mobile_16.html
The page I will be using in this demonstration is a detail view page for a basic contact management web site. The page is used to display the contact information, phone numbers, email address, etc. for a single contact.
Here is a screen shot of the XHTML page in the iPhone 4 Safari browser.

Next is the XHTML for the detail page before I added jQuery.
Here is a screen shot of the page after it has been marked up as HTML 5 and the jQuery Mobile resources, JavaScript and CSS, have been added.

Here is the markup for the HTML 5 page.
Using HTML 5
I started with changing the doctype from the XHTML Basic doctype to the HTML 5 doctype. The jQuery Mobile framework makes use of HTML 5's custom data attributes. These are the attributes "data-*" seen in the markup above and are a feature of HTML 5 intended to allow authors to associate arbitrary data with HTML elements in order to expose that data to custom JavaScript. JQM uses these data attributes to apply styling and behavior to sections of the page. Later in the process when I work on marking up a data entry form I will also be using the new input types introduced in HTML 5.
Adding the jQuery Mobile Resources
In the head element I've added the CSS and JavaScript resources required by the framework. In addition I've referenced an additional custom JavaScript file (custom-mobile-config.js) that contains the settings that I wish to override in the JQM defaults. I plan to cover the contents of this file in a future post.
Adding jQuery Mobile to the Markup
The JQM framework includes roles that specify areas of your page as header, content, footer, and navigation. The entire body of the page has been wrapped in a div with the data-role attribute with the value of "page" and a data-theme attribute. The data-role of "page" defines the marked up content as a JQM page and applies CSS. The optional data-theme attribute applies an alternate set of styles. JQM includes some predefined themes. I have not experimented with defining my own theme but I assume that a theme-roller or other customization method does or will exist for creating and modifying themes.
I have wrapped my page heading in a div with a data-role of "header" which I have included a "navbar" in order to create navigation at the top of the page. Navigation items are wrapped in an unordered list and the page's heading is wrapped in an h1 tag.
I have wrapped the rest of the page's markup in a "content" div and it contains the same content as the original XHTML version of the page. JQM takes care of applying the CSS based on the data-role of "content" and the theme that I specified in the "page" div's data-theme attribute. If you inspect the resulting page's DOM with the Chrome browser's development tools you will see that JQM has applied a added an number of styled elements to the basic markup.

References
jQuery Mobile Project
http://jquerymobile.com
HTML 5 Custom Data Attributes
http://www.w3.org/TR/html5/elements.html#embedding-custom-non-visible-data-with-the-data-attributes
XHTML version of the page used in this post
http://www.customdatasys.com/jqm/start/detail.html
The HTML 5 / JQM version of the page used in this post
http://www.customdatasys.com/jqm/v1/detail.html
The page I will be using in this demonstration is a detail view page for a basic contact management web site. The page is used to display the contact information, phone numbers, email address, etc. for a single contact.
Here is a screen shot of the XHTML page in the iPhone 4 Safari browser.

Next is the XHTML for the detail page before I added jQuery.
<!DOCTYPE html PUBLIC "-//W3C//DTD XHTML Basic 1.1//EN"
    "http://www.w3.org/TR/xhtml-basic/xhtml-basic11.dtd">
<html xmlns="http://www.w3.org/1999/xhtml">
<head>
 <title>A Simple Site | Adams, Abel</title>
</head>
<body>
<div>
<a href="index.html">Contact List</a> || <a href="form.html">New Entry</a><br />
</div>

<h1>Adams, Abel</h1>


<p>
Mr. Abel Adams<br />
Organization: Example, Inc.<br />
Mobile Phone: <a href="tel:555-555-1111">555-555-1111</a><br />
Home Phone: <a href="tel:555-555-2222">555-555-2222</a><br />
Work Phone: <a href="tel:555-555-3333">555-555-2222</a><br />
E-mail Address: <a href="mailto:adams@example.com">adams@example.com</a><br />
</p>

<p>
101 Example Street<br />
Waco, Texas 76710<br />
<a href="http://www.example.com">http://www.example.com</a><br />
</p>

<p>
Birthday: August 4, 1961<br />
Spouse: Anne<br />
</p>


</body>
</html>
Here is a screen shot of the page after it has been marked up as HTML 5 and the jQuery Mobile resources, JavaScript and CSS, have been added.

Here is the markup for the HTML 5 page.
<!doctype html>
<html>
<head>
 <title>A Simple Site | Adams, Abel</title>

 <!-- CSS and scripts required for jQuery mobile -->
 <link rel="stylesheet" href="jquery.mobile-1.0a2.css" />
 <script type="text/javascript" src="jquery-1.4.4.js"></script>
 <script type="text/javascript" src="custom-mobile-config.js"></script> <!-- this is a custom script file -->
 <script type="text/javascript" src="jquery.mobile-1.0a2.js"></script>
</head>
<body>

 <div data-role="page" data-theme="b">

  <div data-role="header">
   <div data-role="navbar">
    <ul>
     <li><a href="index.html">Contacts List</a></li>
     <li><a href="form.html">New Entry</a></li>
    </ul>
   </div> <!-- end navbar -->

   <h1>Mr. Abel Adams</h1>
  </div><!-- end header -->

  <div data-role="content">
   <p>
   Mr. Abel Adams<br />
   Organization: Example, Inc.<br />
   Mobile Phone: <a href="tel:555-555-1111">555-555-1111</a><br />
   Home Phone: <a href="tel:555-555-2222">555-555-2222</a><br />
   Work Phone: <a href="tel:555-555-3333">555-555-2222</a><br />
   E-mail Address: <a href="mailto:adams@example.com">adams@example.com</a><br />
   </p>

   <p>
   101 Example Street<br />
   Waco, Texas 76710<br />
   <a href="http://www.example.com">http://www.example.com</a><br />
   </p>

   <p>
   Birthday: August 4, 1961<br />
   Spouse: Anne<br />
   </p>

   <p>
   Notes:<br />
   Is senior manager at Example,Inc.<br />
   Hobbies are golf and poker<br />
   </p>

  </div> <!-- end content div -->

 </div> <!-- end page div -->
</body>
</html>
Using HTML 5
I started with changing the doctype from the XHTML Basic doctype to the HTML 5 doctype. The jQuery Mobile framework makes use of HTML 5's custom data attributes. These are the attributes "data-*" seen in the markup above and are a feature of HTML 5 intended to allow authors to associate arbitrary data with HTML elements in order to expose that data to custom JavaScript. JQM uses these data attributes to apply styling and behavior to sections of the page. Later in the process when I work on marking up a data entry form I will also be using the new input types introduced in HTML 5.
Adding the jQuery Mobile Resources
In the head element I've added the CSS and JavaScript resources required by the framework. In addition I've referenced an additional custom JavaScript file (custom-mobile-config.js) that contains the settings that I wish to override in the JQM defaults. I plan to cover the contents of this file in a future post.
<!-- CSS and scripts required for jQuery mobile -->
 <link rel="stylesheet" href="jquery.mobile-1.0a2.css" />
 <script type="text/javascript" src="jquery-1.4.4.js"></script>
 <script type="text/javascript" src="custom-mobile-config.js"></script> <!-- this is a custom script file -->
 <script type="text/javascript" src="jquery.mobile-1.0a2.js"></script>
Adding jQuery Mobile to the Markup
The JQM framework includes roles that specify areas of your page as header, content, footer, and navigation. The entire body of the page has been wrapped in a div with the data-role attribute with the value of "page" and a data-theme attribute. The data-role of "page" defines the marked up content as a JQM page and applies CSS. The optional data-theme attribute applies an alternate set of styles. JQM includes some predefined themes. I have not experimented with defining my own theme but I assume that a theme-roller or other customization method does or will exist for creating and modifying themes.
I have wrapped my page heading in a div with a data-role of "header" which I have included a "navbar" in order to create navigation at the top of the page. Navigation items are wrapped in an unordered list and the page's heading is wrapped in an h1 tag.
I have wrapped the rest of the page's markup in a "content" div and it contains the same content as the original XHTML version of the page. JQM takes care of applying the CSS based on the data-role of "content" and the theme that I specified in the "page" div's data-theme attribute. If you inspect the resulting page's DOM with the Chrome browser's development tools you will see that JQM has applied a added an number of styled elements to the basic markup.
References
jQuery Mobile Project
http://jquerymobile.com
HTML 5 Custom Data Attributes
http://www.w3.org/TR/html5/elements.html#embedding-custom-non-visible-data-with-the-data-attributes
XHTML version of the page used in this post
http://www.customdatasys.com/jqm/start/detail.html
The HTML 5 / JQM version of the page used in this post
http://www.customdatasys.com/jqm/v1/detail.html
Subscribe to:
Posts (Atom)