Showing posts with label Dynamics. Show all posts

Friday, August 27, 2010

Setting the Default View in CRM

Although the default view of entities in CRM is generally adequate, many times you will want to change the default view to something else. You do this by going to Settings-> Customization-> Customize Entities and then editing the entity in question.

I will customize the Contact entity. Select Forms and Views and then select My Active Contacts (only select we don't want to edit at this time). Now click the More Actions button and Set Default. Now you've changed your default view.

Tuesday, August 24, 2010

Turn off the CRM Tracking Number in Email Subject Lines

Turning off the tracking number in the email subject line is a simple proposition in CRM. Simply go to Settings-->Administration-->System Settings. Select the E-mail tab and uncheck the "Use tracking token" check box.

Monday, August 23, 2010

Custom Entity in Microsoft Dynamics CRM

In this post I will walk you through creating a custom entity in Microsoft Dynamics CRM 4.0.

CRM makes it easy to create a simple entry form that can be used to store data. First, navigate to the customization section by going to Settings-Customization and selecting Customize Entities. Then click the New button.

Some basic information must be completed for the new entity, such as Name, ownership and where you want this new entity to appear. We will create an entity named Album to store information about... well, albums. We will select User for the Ownership and uncheck Activities from the relationships. Also, I will show this new entity in Service, so we will check that box. On the Primary Attribute tab, I am just taking all of the defaults. Click Save and you have yourself a new custom entity. At this point it will only hold the name of the album and some notes, so let's create some attributes for our album.


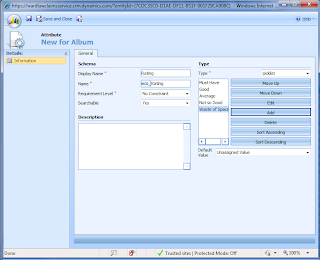
To create attributes go to the Attributes tab and select New. Type Artist in the Display Name field and click the Save and New button. Do the same for Title. The nvarchar datatype is fine for those two attributes, but now let's add Release Date as an attribute and specify datetime for the Type. Again, click Save and New and let's create a rating attribute and specify a type of Picklist. You now have the ability to add pick list options. I added the options in the image below, but you can make the values whatever you like. Click Save and Close.

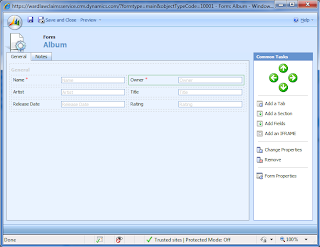
Now that we have some custom attributes, let's add them to our form. Select Forms and Views from the Album tab and then double-click the Form entry. Next, select Add Fields and select the four attributes you just created. Arrange the entities on the form however you like. I included a screenshot of what my form looks like. You can also preview what the form will look like by selecting Preview from the toolbar and then Create Form. When you are satisfied with your product select Save and Close. Now click the Publish button from the Album form to publish your changes.


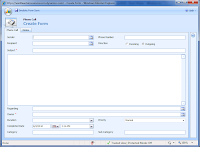
Next, browse to the Service Section and add albums.

Wednesday, August 4, 2010

Set a Default Date in Dynamics CRM 4.0 Using JavaScript

This blog will demonstrate how to set a default due date for the Phone Call entity in Dynamics CRM 4.0 by using a little bit of JavaScript.

T0 start go to Settings-->Customization-->Customize Entities. Scroll down to Phone Call and edit it by double-clicking or selecting More Actions and Edit from the toolbar.


Next, select Forms and Views and edit the Form. Select Form Properties and click the Edit button for the OnLoad Event. Copy the following code into the editor and click OK.

var CRM_FORM_TYPE_CREATE = "1";
var DUE;
var TODAY;

// Only make these changes when the form is opened in Create mode.
if (crmForm.FormType==CRM_FORM_TYPE_CREATE)
{
// Get today's date.
TODAY = new Date();

DUE = TODAY.setDate( TODAY.getDate());
crmForm.all.scheduledend.DataValue = DUE;
}


Now let's test our work by selecting Preview and Create Form. You will notice that the default value for Completed Date is now the current date and time. Note that I changed the "Due" to "Completed" date on the form editor.


Monday, August 2, 2010

Microsoft Dynamics CRM - Rename Attributes and Rearrange Them

In this entry I will demonstrate how to customize Microsoft Dynamics CRM 4.0 by renaming attributes and rearranging them on a form.

To start go to Settings-->Customization-->Customize Entities and select the entity you want to customize by double-clicking or selecting More Actions and Edit. For our example, I will customize Lead.


To change the display name of an item on the form select Attributes and select attribute to rename and Edit. For our example I will change "E-mail Address 1" to "E-mail".


Save and Close the open forms then select "Forms and Views" and edit the Form object. Next, to move the E-mail address to Contact Information, use the arrow buttons on the right hand side of the Lead Form editor to rearrange attributes as you like.


When you have everything arranged like you want, publish the customizations by clicking the Publish button.

I hope you enjoyed this quick walk-through about how to rename and rearrange attributes in Microsoft Dynamics CRM 4.0

Wednesday, July 14, 2010

How to Import Outlook Contacts to Micrsoft Dynamics CRM

Importing your contacts from Outlook into Dynamics CRM is a relatively painless and straight-forward process.

  1. Export your contact list from Outlook to a CSV file (File->Import and Export)


  2. Select Export to a File


  3. Select Comma Separated Values (Windows)


  4. Select the Contacts folder


  5. Open up the file in Excel and look for any strange data - for example I deleted the birthday column because all of the birthdays in my contact list were 0/00/00 which gave me an error.

  6. In CRM go to Workplace->Imports

  7. Select Import from Files in section 1 or New from the data grid toolbar

  8. Click the Browse button to select the file you just created and hit next


  9. If you want to review the delimiters you can or just hit next

  10. Next, you have the option to map the data automatically or use an existing map

  11. Select Contacts from the drop down and hit next

  12. A warning icon appears next to fields that need your attention. You may select ignore, create new field or select an existing field from the drop down


  13. Before you import you get a form that will allow you to set the owner of the contacts, prompt you for an optional data map name and ask you if you want to allow duplicates


  14. Hitting submit will submit your job to run

  15. Refreshing the grid will enable you to see the progress of the job

  16. Once the Status Reason says complete you can see the number of successes, errors and the total count

  17. If you had no errors, Navigate to Contacts, you may need to select the active contacts view and there are your imported contacts